Support

Below are some resources to help you use the Utensil app. If you have further questions or would like to provide us feedback, please use the contact link within the app. That link can be found at Utensil > Settings > Contact & Feedback. We hope you're enjoying Utensil!

pic

Shortcut Gallery

We've created a collection of Shortcuts to help you get the most out of Utensil. Modify as you'd like or use them as examples to create your own. We'd love to see what you make so use the contact link within the app and tell us about how you're using Utensil's Shortcuts support.

Browse the Utensil Shortcuts Gallery

Frequently Asked Questions

Use Cases

Utensil’s primarily purpose to help you save and organize recipes. Unlike recipe managers that are opinionated about how you should do that, Utensil exists to let you use the tools and methods that work for you, whether that’s in print or in some electronic format. Simply clip the recipe with Utensil and then export to your favorite notes app or print it.

Clip whatever recipes sound good at the moment, then keep only the most interesting. Simply clip recipes to Utensil, review or experiment at your convenience, and then export only the best recipes to your collection. No cluttering up your recipe collection while you experiment!

Or using Utensil's Shortcut action make a shortcut that asks ChatGPT for complementary recipes!

Need to modify or scale a recipe? No problem. Simply clip it to Utensil, edit any field or substitute the photo, then export the recipe any way you’d like!
Within Utensil, scroll to the recipe you'd like to export. Select the export option at the bottom of the screen, either an app or a file format, tap the ^ button and follow the prompts. Or use Utensil's Shortcut Action to clip a recipe and manipulate the recipe data any way you'd like.
There are a couple ways to print from Utensil but the easiest method is to select PDF export and when the share sheet opens, select Print. Your nicely formatted PDF file will then print.

Using Utensil

Using Safari, open a webpage containing a recipe you’d like to clip.

Tap the share button and select Utensil from the apps listed in the second row of the iOS share sheet. Utensil’s progress indicator may appear briefly followed by the Clip Recipe sheet containing the clipped recipe.

Tap the checkmark at top-right of the sheet to send the recipe to Utensil.

In addition to editing recipes from within Utensil, you can also edit them Clip Recipe sheet displayed when you clip the recipe.

Simply tap the (>) symbol next to any field, or the (…) next to the image, to edit that part of the recipe. Tap the checkmark at top-right of the sheet to save the changes.

Then tap the checkmark at top-right of the Clip Recipe sheet to send the edited recipe to Utensil.

Recipes
Swipe left or right to browse recipes. Double-tap to view or edit a recipe. Swipe up to delete a recipe.

Export Options
Swipe export methods at the bottom of the main screen left or right to browse currently enabled export options. Tap the ellipsis button at the end of the list to enable, disable, or configure export options.

Double-tap on the recipe you wish to edit then simply tap the (>) symbol next to any field, or the (…) next to the image, to edit that part of the recipe.

Tap the checkmark at top-right of the sheet to save the changes.

You can enable, disable, customize, and reorder the export options at the bottom of Utensil's main screen.

To configure your export options, open Utensil's settings by tapping on the icon at the top-right of the app's main screen.

Tap Export Options in the Exporting section.

To enable an export option, tap it and then toggle the Enable toggle on the next screen. Then tap the highlighted back arrow. You will then see that option added to the list of enabled export options. Tap the the highlighted back arrow and finally the highlighted check on the main settings screen. You will then find the export option in the horizontal scroll list at the bottom of Utensil's main screen.

To disable an export option, follow the steps above toggling off the Enable switch.

To reorder the list of export options on the main screen, simply use the handlebars next to the option name in the list of enabled export options. Then tap the highlighted back arrow and finally the highlighted check on the main settings screen.

To customize the settings of a specific export option, tap down into an enabled option, configure as you'd like, and then tap the highlighted back arrow and finally the highlighted check on the main settings screen.

To export a recipe, scroll to it then select your desired destination from the export options list at the bottom of the main screen.

Tap the highlighted export button (^) belogning to the chosen export option.

Some export options interact directly with other apps, some make use of the share sheet. You will see one of these appear after tapping the button.

At this time Utensil supports built-in apps like Notes, Reminders, Calendar, Mail, Messages and Shortcuts.

You can also use any app that accepts these standard file formats: Text, Rich Text, Markdown, TextBundle, JSON, or PDF.

You can also send recipes to any app that supports Shortcuts.

And there's more to come!

Specific Apps

The Shortcuts app included on the iPhone is a powerful tool for automating tasks with just a tap or a Siri voice prompt. For additional information about the app and what you can do with it, see Apple's Shortcuts User Guide.

There are two ways to use Utensil with the Shortcuts app:

Export JSON from Utensil to a Shortcut

JSON is a ubiquitous data interchange format consisting of some combination of text-based key/value pairs and/or arrays. Many apps can parse and use JSON, including the Shortcuts app, which refers to JSON objects as Dictionaries. To send JSON to a Shortcut:

  1. Create a Shortcut which accepts files or text from the iOS Share Sheet. To do this, from within your Shortcut, tap the ( i ) information button at the bottom of the screen, enable Show in Share Sheet, and then be sure files and text are included in the list of acceptable inputs indicated in the Receive action now shown at the top of your Shortcut.
  2. Use the standard "Get Dictionary from Input" or "Get Dictionary Values" actions within your shortcut to feed other actions Utensil's JSON blob or values for individual pairs/fields. For examples of how this can work, check out our Shortcuts Gallery.

NOTE: The keys (fields) available in Utnesil's JSON output are: name (the title of the recipe, text), author (the author, text), description (if provided, a brief description of the recipe, text), ingredients (the list of recipe ingredients, comma separated text array), instructions (steps to complete the recipe, comma separated text array), servings (recipe portions, text), prepTime (estimated preparation time in seconds, text), cookTime (estimated cooking time in seconds, text), totalTime (estimated total time to execute recipe in seconds, text), source (the URL to the recipe, text), image (the URL to the recipe's image unless you've set the preference for the image to be base64 encoded in this field, text)
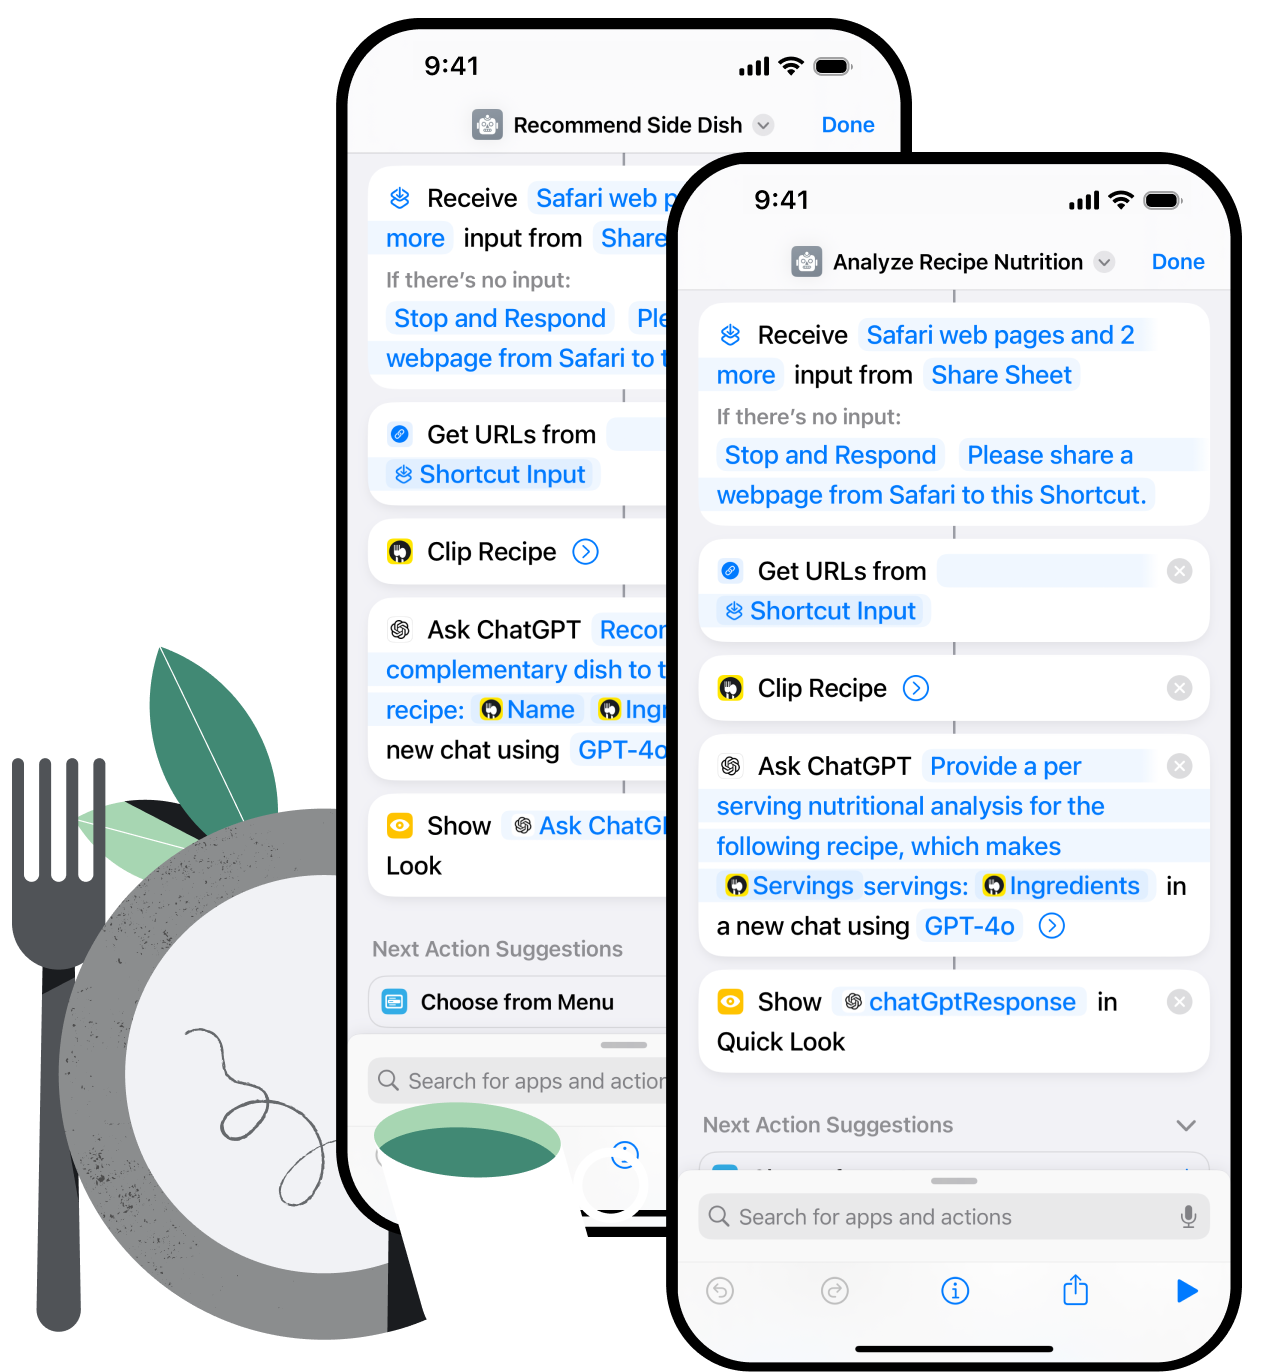
Use Utensil's Clip Recipe Action within a Shortcut

Utensil's Clip Recipe extension takes a URL as input, parses the page at that location for a recipe, then provides that recipe as a dictionary (JSON) to the Shortcut. To use the action:

  1. Create a new Shortcut and add the Clip Recipe action, making sure to supply the action with an input URL via some other action.
  2. Use the standard "Get Dictionary from Input" or "Get Dictionary Values" actions within your shortcut to get data from the Clip Recipe action. For examples of how this can work, check out our Shortcuts Gallery.

NOTE: The keys (fields) available in Utnesil's JSON output are: name (the title of the recipe, text), author (the author, text), description (if provided, a brief description of the recipe, text), ingredients (the list of recipe ingredients, comma separated text array), instructions (steps to complete the recipe, comma separated text array), servings (recipe portions, text), prepTime (estimated preparation time in seconds, text), cookTime (estimated cooking time in seconds, text), totalTime (estimated total time to execute recipe in seconds, text), source (the URL to the recipe, text), image (the URL to the recipe's image unless you've set the preference for the image to be base64 encoded in this field, text)

Although Apple does not provide an API allowing us to fully integrate with the Notes app, there are still a few ways to export recipes to Notes:

Exporting text from Utensil

The Notes app will accept plain text directly from Utensil via the iOS share sheet. To send a recipe in plain text to Notes:

  1. If you do not already have the Text export option enabled, Open Utensil, tap the settings button to open the app's settings, Tap Export Options from the Exporting section, tap on Text and toggle the Enable switch. Reorder in the list if you'd like.
  2. From the main screen, swipe to the recipe you wish to export then swipe to the Text export option in the list at the bottom of the screen.
  3. Tap the [^] export button and when the share sheet appears, select the Notes app.

Exporting PDF from Utensil

The Notes app will accept a PDF file from Utensil via the iOS share sheet. To send a recipe as a PDF to Notes:

  1. If you do not already have the PDF export option enabled, Open Utensil, tap the settings button to open the app's settings, Tap Export Options from the Exporting section, tap on PDF and toggle the Enable switch. Reorder in the list if you'd like.
  2. From the main screen, swipe to the recipe you wish to export then swipe to the PDF export option in the list at the bottom of the screen.
  3. Tap the [^] export button and when the share sheet appears, select the Notes app.

Use a Shortcut

The Shortcuts app has actions that allow you to create and manipulate notes in the Notes app. You can send JSON from Utensil to a Shortcut or use Utensil's Clip Recipe action within a shortcut. See the Shortcuts Gallery for eaxmples.

At this time the best method to get recipes into Google Keep is to export text from Utensil.

exporting text to Google Keep via the Share Sheet

This method allows you to easily create a note containing a nicely formatted recipe and thanks to Keep's URL preview feature, include a thumbnail image.

  1. If you do not already have the Text export option enabled, Open Utensil, tap the settings button to open the app's settings, Tap Export Options from the Exporting section, tap on Text and toggle the Enable switch. Exporting as a file should be diabled. Reorder Text in the list of export options if you'd like.
  2. From the main screen, swipe to the recipe you wish to export then swipe to the Text export option in the list at the bottom of the screen.
  3. Tap the [^] export button and when the share sheet appears, select the Google Keep app. (You may need to tap the [...] more button if you haven't reordered the app list in the share sheet.)
  4. From the Keep dialog box, optionally select a label and tap Save at top right.

There are multiple methods to export recipes to Obsidian, but the two best are exporting Markdown to Obsidian via the share sheet or exporting a markdown file into the Obsidian vault.

export a recipe to Obsidian via the Share Sheet

This method allows you to easily append a nicely formatted recipe to an existing note or to the daily note.

  1. If you do not already have the Markdown export option enabled, Open Utensil, tap the settings button to open the app's settings, Tap Export Options from the Exporting section, tap on Markdown and toggle the Enable switch. Embedding image and exporting as a file should both be diabled. Reorder Markdown in the list of export options if you'd like.
  2. From the main screen, swipe to the recipe you wish to export then swipe to the Markdown export option in the list at the bottom of the screen.
  3. Tap the [^] export button and when the share sheet appears, select the Obsidian app. (You may need to tap the [...] more button if you haven't reordered the app list in the share sheet.)
  4. From the Obsidian dialog box, select a text note where you would like to append the recipe.

export a recipe Markdown file to the Obsidian vault (recommended)t

This method allows you to easily export a recipe into Obsidian as a standalone note.

  1. If you do not already have the Markdown export option enabled, Open Utensil, tap the settings button to open the app's settings, Tap Export Options from the Exporting section, tap on Markdown and toggle on the Enable switch. Toggle on the Export as File option and off Embedding image. Reorder Markdown in the list of export options if you'd like.
  2. From the main screen, swipe to the recipe you wish to export then swipe to the Markdown export option in the list at the bottom of the screen.
  3. Tap the [^] export button and when the share sheet appears, select Save to Files from the vertical list. Navigate to the directory you are using as Obsidian's vault and into a subfolder if you wish. Tap Save at top-right.

There are multiple methods to export recipes to Bear, including eporting text or using a Shortcut, but the two best methods are exporting Markdown to Bear via the share sheet or exporting a Textbundle file from Utensil then importing it into Bear.

export markdown to Bear via the Share Sheet

This method allows you to create a nicely formatted note containing the recipe or append the recipe to an existing note.

  1. If you do not already have the Markdown export option enabled, Open Utensil, tap the settings button to open the app's settings, Tap Export Options from the Exporting section, tap on Markdown and toggle the Enable switch. Embedding image and exporting as a file should both be diabled. Reorder Markdown in the list of export options if you'd like.
  2. From the main screen, swipe to the recipe you wish to export then swipe to the Markdown export option in the list at the bottom of the screen.
  3. Tap the [^] export button and when the share sheet appears, select the Bear app. (You may need to tap the [...] more button if you haven't reordered the app list in the share sheet.)
  4. From the Bear dialog box, tap save to create a dedicated note with the recipe, or select Start off... or End of... to append the recipe to an existing note.

NOTE: Bear doesn't seem to support embedding images with standard Markdown on import. However, if you remove the leading exclamation point in the Markdown, it can be treated as a link with a preview.

export a Textbundle file to Bear (recommended)

This method allows you to easily export a recipe, icluding a photo, into Obsidian as a standalone note.

  1. If you do not already have the Textbundle export option enabled, Open Utensil, tap the settings button to open the app's settings, Tap Export Options from the Exporting section, tap on Textbundle and toggle on the Enable switch. Reorder Textbundle in the list of export options if you'd like.
  2. From the main screen, swipe to the recipe you wish to export then swipe to the Textbundle export option in the list at the bottom of the screen.
  3. Tap the [^] export button and when the share sheet appears, select Save to Files from the vertical list. Navigate to a conveinient directory and tap Save at top-right.
  4. Open the Bear app and tap the hamburger menu icon at top left to open the Bear's top-level menu. Tap the vertical ellipsis icon at top left and tap Import Notes. Select the Use first line as title and tap Import Notes. Navigate to the Textbundle file, tap it and then tap Open at top right.

Notability can technically accept a number of document formats, but given the app's robust support for PDF, this is the best option.

Exporting PDF from Utensil

To send a recipe in PDF format to Notability:

  1. If you do not already have the PDF export option enabled, Open Utensil, tap the settings button to open the app's settings, Tap Export Options from the Exporting section, tap on PDF and toggle the Enable switch. Reorder in the list if you'd like.
  2. From the main screen, swipe to the recipe you wish to export then swipe to the PDF export option in the list at the bottom of the screen.
  3. Tap the [^] export button and when the share sheet appears, select the Notability app. (You may need to tap the [...] more button if you haven't reordered the app list in the share sheet.)
  4. From the Notability dialog box, select the option for a new note, select the target subject, and tap Import at top left.

GoodNotes can technically accept a number of document formats, but given the app's robust support for PDF, this is the best option.

Exporting PDF from Utensil

To send a recipe in PDF format to GoodNotes:

  1. If you do not already have the PDF export option enabled, Open Utensil, tap the settings button to open the app's settings, Tap Export Options from the Exporting section, tap on PDF and toggle the Enable switch. Reorder in the list if you'd like.
  2. From the main screen, swipe to the recipe you wish to export then swipe to the PDF export option in the list at the bottom of the screen.
  3. Tap the [^] export button and when the share sheet appears, select the GoodNotes app. (You may need to tap the [...] more button if you haven't reordered the app list in the share sheet.)
  4. From the GoodNotes dialog box, select import loaction and then tap Import as New Document at bottom.

There are many ways to import recipes into Craft, but the simplist methods are either to export text to Craft or use a Shortcut for more advanced formatting.

Exporting Text from Utensil

To send a recipe in text format to Craft:

  1. If you do not already have the Text export option enabled, Open Utensil, tap the settings button to open the app's settings, Tap Export Options from the Exporting section, tap on Text and toggle the Enable switch. Reorder in the list if you'd like.
  2. From the main screen, swipe to the recipe you wish to export then swipe to the Text export option in the list at the bottom of the screen.
  3. Tap the [^] export button and when the share sheet appears, select the Craft app. (You may need to tap the [...] more button if you haven't reordered the app list in the share sheet.)
  4. From the Craft dialog box, select new document, select the target space, and then tap Save at top right.

Use a Shortcut

Using a Shortcut to import your recipes into Craft gives you the ability to do more advanced formatting. To use the sample Shortcut we've created for use with Craft:

  1. Download the Recipe to Craft shortcut from the Shortcuts Gallery.
  2. From the main screen, swipe to the recipe you wish to export then swipe to the JSON export option in the list at the bottom of the screen.
  3. Tap the [^] export button and when the share sheet appears, select the Recipe to Craft Shortcut from the vertical list.

At present, the best way to export a recipe to Evernote is to use a Shortcut.

Using a Shortcut

Using a Shortcut to import your recipes into Evernote yields a nicely formatted recipe, inclding a photo. To use the sample Shortcut we've created for use with Evernote:

  1. Download the Recipe to Evernote shortcut from the Shortcuts Gallery.
  2. From the main screen, swipe to the recipe you wish to export then swipe to the JSON export option in the list at the bottom of the screen.
  3. Tap the [^] export button and when the share sheet appears, select the Recipe to Evernote Shortcut from the vertical list.

There are currently two methods to export recipes to OneNote:

Exporting text from Utensil

OneNote will accept plain text directly from Utensil via the iOS share sheet. To send a recipe in plain text to Notes:

  1. If you do not already have the Text export option enabled, Open Utensil, tap the settings button to open the app's settings, Tap Export Options from the Exporting section, tap on Text and toggle the Enable switch. Be sure the Export as File option is disabled. Reorder in the list if you'd like.
  2. From the main screen, swipe to the recipe you wish to export then swipe to the Text export option in the list at the bottom of the screen.
  3. Tap the [^] export button and when the share sheet appears, select the OneNote app.

Exporting PDF from Utensil

OneNote will also accept a PDF file from Utensil via the iOS share sheet. To send a recipe as a PDF to Notes:

  1. If you do not already have the PDF export option enabled, Open Utensil, tap the settings button to open the app's settings, Tap Export Options from the Exporting section, tap on PDF and toggle the Enable switch. Reorder in the list if you'd like.
  2. From the main screen, swipe to the recipe you wish to export then swipe to the PDF export option in the list at the bottom of the screen.
  3. Tap the [^] export button and when the share sheet appears, select the OneNote app.

There are currently two ways to export recipes to your Day One journal:

Exporting text from Utensil

The Day One app will accept plain text directly from Utensil via the iOS share sheet. To send a recipe in plain text to Notes:

  1. If you do not already have the Text export option enabled, Open Utensil, tap the settings button to open the app's settings, Tap Export Options from the Exporting section, tap on Text and toggle the Enable switch. Reorder in the list if you'd like.
  2. From the main screen, swipe to the recipe you wish to export then swipe to the Text export option in the list at the bottom of the screen.
  3. Tap the [^] export button and when the share sheet appears, select the Day One app. (You may need to tap the [...] more button if you haven't reordered the app list in the share sheet.)
  4. From the Day One dialog box, make any edits to the recipe you wish, select the target journal, and add any deired tags. Then tap Save.

Use a Shortcut

The Day One app has robust support for Shortcuts. This option gives you the ability to do more advanced formatting and include images. We've created a sample shorctut that creates a nicely formatted recipe, including a picture and a recipe tag, in the journal you choose. To use the sample Day One Shortcut:

  1. Download the Recipe to Meal Journal shortcut from the Shortcuts Gallery.
  2. From the main screen, swipe to the recipe you wish to export then swipe to the JSON export option in the list at the bottom of the screen.
  3. Tap the [^] export button and when the share sheet appears, select the Recipe to Meal Journal.

There are currently two ways to export recipes to Apple's Journal app:

Exporting text from Utensil

Journal will accept plain text directly from Utensil via the iOS share sheet. To send a recipe in plain text to Notes:

  1. If you do not already have the Text export option enabled, Open Utensil, tap the settings button to open the app's settings, Tap Export Options from the Exporting section, tap on Text and toggle the Enable switch. Export as file should be disabled. Reorder in the list if you'd like.
  2. From the main screen, swipe to the recipe you wish to export then swipe to the Text export option in the list at the bottom of the screen.
  3. Tap the [^] export button and when the share sheet appears, select the Journal app. (You may need to tap the [...] more button if you haven't reordered the app list in the share sheet.)
  4. From the Journal dialog box, make any edits to the recipe you wish then tap Save at top right.

Using a Shortcut (reccomended)

This option gives you the ability to include images. We've created a sample shorctut that creates a nicely formatted recipe, including a picture. To use the sample Journal app Shortcut:

  1. Download the Recipe to Journal shortcut from the Shortcuts Gallery.
  2. From the main screen, swipe to the recipe you wish to export then swipe to the JSON export option in the list at the bottom of the screen.
  3. Tap the [^] export button and when the share sheet appears, select the Recipe to Journal shortcut from the vertical list.